Getting Started Lie-Nielsen Toolworks

Getting Started

When you first receive a plane from us, spend five minutes honing the blade on your finest stone. Then, adjust the cap pressure: on a Bench Plane you want to be able to adjust the blade depth without unlocking the cap; on a Block Plane, the cap needs to be a bit tighter. Then, use the tool. Later on, adjust the chipbreaker and mouth opening as needed for your work. That's it!


Core Tools

Core Tools

The Core Tool Concept can help demystify the world of hand tools for people who are just getting started with hand tool woodworking.

A simple set of core hand tools enables you to efficiently and safely build furniture in a small shop, for a fraction of the cost and space required for power tools to do the same things. Not only is each core tool capable of performing a variety of tasks individually, but they offer virtually limitless possibilities when they work together as a set.

Unless you are already a seasoned hand tool woodworker, the vast array of hand tool choices in today's market may seem overwhelming. Here are some tips for choosing core tools for furniture building.

Planes:

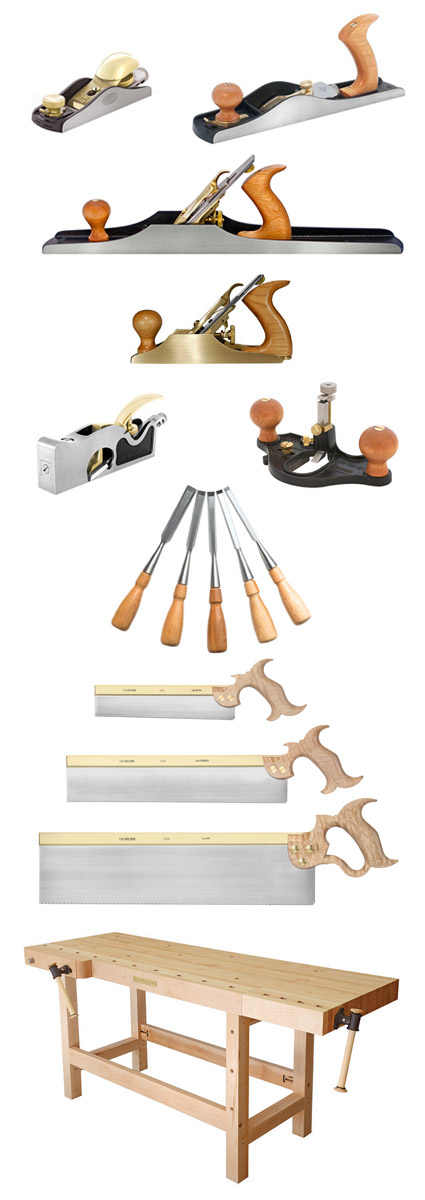
Everyone needs a Block Plane, and our No. 60½ Adjustable Mouth Block Plane is the most versatile design. If you start with rough wood, the next tool you need is a Jack Plane – our No. 62 Low Angle Jack is our favorite.

Next (or if you start with pre-surfaced wood), comes a flattening tool, which would be a Jointer Plane, usually a No. 7 or 8.

For finishing surfaces you will need a Smoother – a No. 4 or  is a good place to start. Then, consider a shoulder plane for trimming joints – the No. 073 Large Shoulder Plane will handle large and small jobs – and other Joinery Planes, like the Router Planes, depending on your work.

Chisels:

Start with a couple of sizes and go from there. Our chisels only need a light honing to get started.

Saws:

For joinery, start with a Tapered Dovetail Saw. Next, you will need a Tapered Crosscut Saw – the Carcass Saw -- and later a Tapered Tenon Saw. Especially when sawing, remember: let the tool do the work.

Workbenches:

Often overlooked, a good bench is essential for hand tool work. A well designed bench holds your boards so you can easily work the faces, edges and ends of your pieces. Our workbenches and vise hardware are designed to be rugged and effective at holding the work for a variety of operations.

Sharpening & Cutting Angles for Planes

To get the most out of your hand tools, it is important to learn to sharpen well. Two waterstones (coarse and fine, 1000 & 8000 grit, for example), a Honing Guide, and a way to keep your stones flat will get you going. Visit our YouTube channel for a simple, effective method that gets great results.

The cutting angle is the angle the blade presents to the wood. On bevel up blades, the cutting angle is the blade's bevel angle (usually 25°) plus the bedding angle (usually 12°). On bevel down blades (bench planes), the cutting angle is the angle the blade is set in the tool. Traditionally, bench planes have the blade set at 45°, but different cutting angles are better for different types of work — which is why we offer high angle frogs.

These angles are intended as a guide – the exact angle is not as important as finding what works and using a sharpening method that allows you to re-sharpen at the same angle each time.

  • 35° to 40° – ideal for end grain.
  • 40° to 50° – standard cutting angle for general work with relatively low cutting resistance.
  • 50° to 60° – minimizes tearout on highly figured woods.
  • 100° or more – for scraping jobs.

Instructional DVDs and YouTube Videos

Many of our customers are new to hand tool woodworking or want to take their skills to the next level. Our expanding line of instructional DVDs and YouTube videos, produced in-house, explore a wide range of hand tool woodworking topics and feature many of today’s master woodworkers.


0 to 0 of 0 results for Getting Started