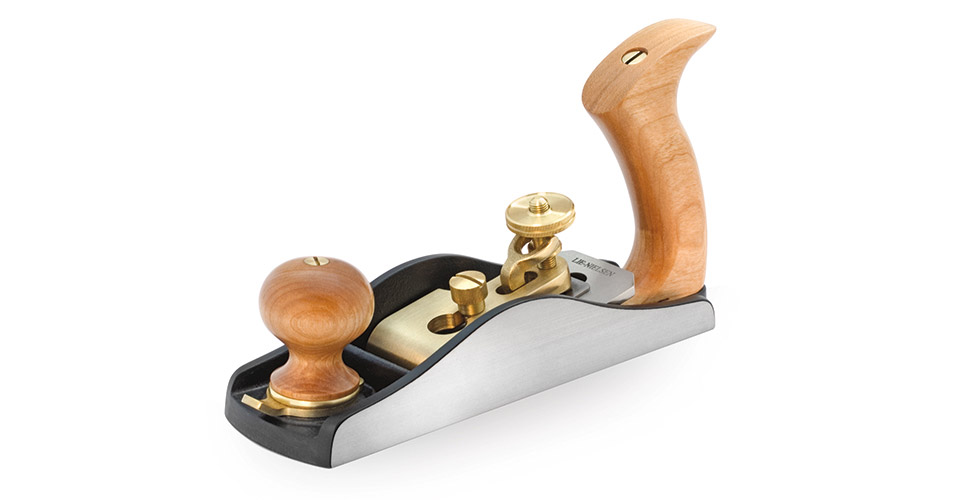
No. 164 Low Angle Smoothing Plane
This compact, low-angle plane is capable of fine smoothing cuts or rapid stock removal and copes easily with end grain and knotty wood. Based on the rare Stanley 164, it is essentially a low angle version of the No. 4 Smooth Plane and a shorter version of the Low Angle Jack. The adjustable mouth and the unique, overhead, Bailey-type blade adjuster allow smooth adjustment of the cutting depth, even while planing.
- 9-1/2" long.
- Blade is 2" wide x .187" thick, bedded at 12°.
- Iron body, 3.75 lbs.
Fine Woodworking's
"Reader's Choice"
- Tool Guide
Click here to download a PDF copy of the instructions for this tool.
Low Angle Smoothing Plane
Stanley produced three large-format low angle block planes. One of these, the Low Angle Smoothing Plane, was only made from 1926 to 1943, which may account for the extraordinarily high prices that it commands on the antique market. Our Low Angle Smoother is based on the Stanley — it is essentially a shorter version of the Low Angle Jack. It has an adjustable mouth, and a unique overhead Bailey adjuster for depth of cut. The Smoothing Plane is useful in a wide variety of jobs from rough work to smoothing, and can be easily converted from one type of work to another. The best finishes will be obtained with a very sharp blade set to take a fine cut, and the mouth opening no larger than necessary to pass the chip. When you want to cut more aggressively, open the mouth more and advance the blade for a deeper cut. For best results on end grain, set the blade and mouth fine.
Geometry:
The blade sits in the body at 12°. It comes with a 25° flat
ground bevel, making the included cutting angle 37°.
Sharpening:
The blade comes ready to use, but honing a secondary bevel of 5° will increase performance, help achieve a razor edge quickly, and improve edge life in hardwoods. You can find sharpening instructions in a printable PDF format here:
Sharpening Instructions PDF
For more information on advanced sharpening we recommend David Charlesworth’s video Plane Sharpening, available in both DVD and streaming formats.
Blade Adjustment:
The blade is easily adjusted with the adjuster nut over the cap iron. This unique arrangement provides silky smooth adjustment. Turn the screw clockwise to advance and counter clockwise to retract the blade. You do not need to loosen the cap screw to do this. Make sure the mouth is adequately open before advancing the blade to avoid damaging your edge. When adjusting the blade, it is a good idea always to finish on a forward adjustment. This takes up backlash in the adjuster mechanism and will help prevent the blade from slipping in use.
Mouth Adjustment:
Hold the tool in one hand and loosen the front knob about 1/4 turn. Adjust with the brass lever. Tighten the knob again firmly, but do not over tighten.
Lateral Adjustment:
Like our Low Angle Jack, the Low Angle Smoother intentionally has very little lateral adjustment of the blade. This is an advantage. As you adjust the blade, it will track squarely with the sole. The disadvantage is that you must sharpen the blade square. Today there are many good jigs on the market that make this easy to do. If you find that you don’t like this feature, you can grind the blade narrower to give more lateral play.
Setting the Yoke Plate:
The overhead yoke engages the slotted plate screwed to the blade. The front of this plate needs to be about 2-1/2" from the cutting edge, with the slot toward the front of the blade. You can make a small jig with scraps of wood to set this distance. Tighten the plate retaining screw very firmly to adjust the blade.
To Remove the Cap:
Loosen the 9/16" slotted cap screw several turns. Lift the cap by the adjusting nut and slip the cap over the cap screw through the large hole. Reverse the process to replace, making sure the gear tooth yoke end fits into the slot in the blade adjustment plate. The tapered shoulder of the cap screw fits into the countersink in the cap. You should tighten this screw firmly.
Handling the Tool:
You will probably find that, with a full grip around the handle, your little finger will not have much room. The No. 164 is very short for a handled tool (this is the reason for the overhead adjuster), and to get a maximum of usable blade, some finger room is sacrificed. This will improve as the blade shortens with sharpening. Meanwhile, grip high or with three fingers — the little finger pointing forward or the index finger curled around the adjuster screw.
Materials:
The body is cast from Ductile Iron, a very strong alloy that
will take a lot of abuse. These castings are fully stress-relieved, a process
that removes inherent stresses and ensures that the tool will remain flat
and true. The cap is Manganese Bronze. Other parts are Brass and Steel.
The blade is 3/16" thick A2 Tool Steel hardened to Rockwell 60-62,
cryogenically treated and double tempered. Our heat treating technique
ensures that the blade will take and hold a very fine edge for a long time.
After heat treating, the blade is fully surface ground on the top, back, and
cutting edge, giving a smooth, flat surface that will take a mirror finish
very quickly. The thick blade provides solid chatter-free cutting.
Maintenance:
The sole is ground flat to .0015" or less. Occasional hand
lapping with fine wet/dry sandpaper (320 grit or finer) on a flat surface like a glass plate will help remove dings and keep it true. The cap iron
can be polished with any good brass polish, or allowed to patina with
age and use. Occasionally, the tool should be disassembled, cleaned and
moving parts oiled. The blade should be kept lightly oiled to prevent rust,
especially when the tool is not in use. We recommend Jojoba Oil, a plant based oil product that is non-toxic, odor-free and easy to use. Also, in our shop, we use a fine abrasive handblock to remove any light surface oxide from tool bodies and blades. Jojoba Oil and abrasive handblocks are available from us.
Many people like the patina that Bronze gets with age and use, but if you wish to keep the finish bright, a little brass polish is in order. The Cherry knob and handle are oiled and buffed with wax to produce a natural finish. Wipe with oil as desired to refresh.
Find everything you need for tool care.
Guarantee:
Materials and workmanship are guaranteed for the life of your tool. Call for repairs or replacement parts. We are available for advice if you ever have a problem using your tool.
Proposition 65 Notice:
Bronze and brass alloys contain lead, a chemical known to the State of California to cause cancer and birth defects, or other reproductive harm. Wash hands after handling.